
Google always works hard for serving their customers better quality service than others. That’s why it is a leading internet company and top 1 website in the whole world. In our previous post we have discussed about the benefits of using custom domain for a blog. Many bloggers who have custom domain name for their blog are not aware or for difficulty of MX records in their hosting account for the custom email address with their domain name. That’s the main causes they are unable to use a branded email address.

For example: If you have a custom domain name www.example.com then you will be able to use email address like yourname@example.com. Isn’t it looks more credibility and professional? Of course this will present you as a pro blogger and serious online worker. Using and providing public email address (@gmail.com, @yahoo.com, @hotmail.com) will never present you as a professional and expert.
In our today’s tutorial we are going to learn how to create custom email addresses using your domain name with Gmail, and you will get 10 GB storage for saving all your emails and media without paying a single dollar with Google Apps service. You can create up to ten custom email addresses. Although it’s Goggle, which means you will be always stay safe and protected.
Now, let’s move forward to know How to create a custom email address with a domain name by using Google Apps and Gmail.
1. First go to Google Apps page.
2. Sign up for Google Apps.
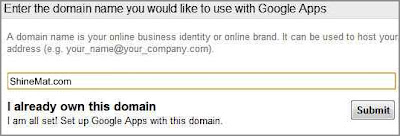
3. Submit your blog/ website address without “http://www.” (i.e. domain.com)
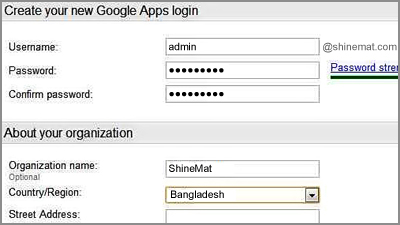
4. Put all necessary information in blank boxes. Make sure your username is simple and able to remember, because it will be your custom gmail email address.
5. Type an email address that you use regularly in alternate email address box. This will help you for password recovery.
6. Tick to Accept their TOS.
7. Finally click Submit button to create you account.
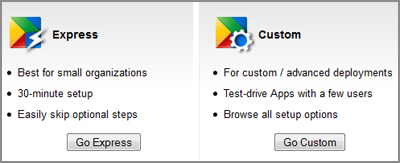
1. Now, you have to verify your ownership of your domain name. There are two option you will be given. First one is Express and second is Custom. Click Express.
2. Click next buttons to get Domain Verification Page. You will be given five (5) options to verify your domain ownership.
3. Click Alternate methods tab, Click HTML Tag option.
4. Copy the meta tag and go to your blogger template/ index file and paste this meta tag just below <head> tag. (press Ctrl+F to search on template)
5. Click Save Template
6. From Google Apps click Verify button.
7. Click Continue link to get Google Apps Setup options.
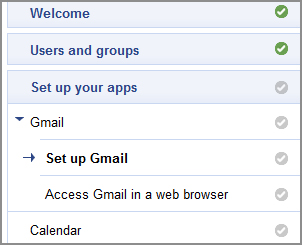
8. Keep clicking Next until you get Set up Gmail.
9. You will get MX Records to add the settings.
10. You will be given some MX Record entries which you will need to add in your hosting panel.
11. Now, go to your web hosting cPanel and find Email server, DNS management or something like these option.
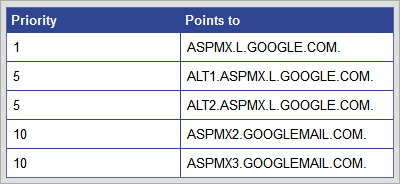
12. Click MX Records or MX Entry option. Then click Add New MX Record and enter the following MX entries one by one given by Google Apps.
■ Make sure you remove all other MX records.
13. Click Next buttons till you complete the setup.
Note: Upgrading MX Records will take 24-48 hours. So don’t panic and please be patient.
You can access your custom gmail address dashboard by typing https://www.google.com/a/cpanel/yourdomain
If you wish to change it to mail.yourdomain.com, simply go to Settings and click Email and change URL.
Choose second option and type “mail” (i.e. http://mail.yourdomain.com)
Hit Save Changes and you are all done.
That’s all for this tutorial. Hope you have not faced any problems. If there are any problems in setup, let me know to serve you. Have a good day and happy blogging.
For example: If you have a custom domain name www.example.com then you will be able to use email address like yourname@example.com. Isn’t it looks more credibility and professional? Of course this will present you as a pro blogger and serious online worker. Using and providing public email address (@gmail.com, @yahoo.com, @hotmail.com) will never present you as a professional and expert.
In our today’s tutorial we are going to learn how to create custom email addresses using your domain name with Gmail, and you will get 10 GB storage for saving all your emails and media without paying a single dollar with Google Apps service. You can create up to ten custom email addresses. Although it’s Goggle, which means you will be always stay safe and protected.
Now, let’s move forward to know How to create a custom email address with a domain name by using Google Apps and Gmail.
1. First go to Google Apps page.
2. Sign up for Google Apps.
3. Submit your blog/ website address without “http://www.” (i.e. domain.com)
4. Put all necessary information in blank boxes. Make sure your username is simple and able to remember, because it will be your custom gmail email address.
5. Type an email address that you use regularly in alternate email address box. This will help you for password recovery.
6. Tick to Accept their TOS.
7. Finally click Submit button to create you account.
How to verify the domain ownership
1. Now, you have to verify your ownership of your domain name. There are two option you will be given. First one is Express and second is Custom. Click Express.
2. Click next buttons to get Domain Verification Page. You will be given five (5) options to verify your domain ownership.
3. Click Alternate methods tab, Click HTML Tag option.
4. Copy the meta tag and go to your blogger template/ index file and paste this meta tag just below <head> tag. (press Ctrl+F to search on template)
5. Click Save Template
6. From Google Apps click Verify button.
7. Click Continue link to get Google Apps Setup options.
8. Keep clicking Next until you get Set up Gmail.
9. You will get MX Records to add the settings.
10. You will be given some MX Record entries which you will need to add in your hosting panel.
11. Now, go to your web hosting cPanel and find Email server, DNS management or something like these option.
12. Click MX Records or MX Entry option. Then click Add New MX Record and enter the following MX entries one by one given by Google Apps.
MX Record Settings Format
Priority: 0
Destination: ASPMX.L.GOOGLE.COM
■ Make sure you remove all other MX records.
13. Click Next buttons till you complete the setup.
Note: Upgrading MX Records will take 24-48 hours. So don’t panic and please be patient.
- Did You Know: How To Host Web Scripts Or Files On Google Drive?
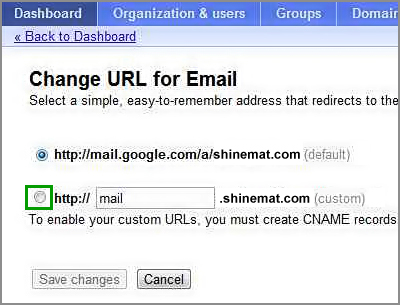
How to create custom email web address
You can access your custom gmail address dashboard by typing https://www.google.com/a/cpanel/yourdomain
If you wish to change it to mail.yourdomain.com, simply go to Settings and click Email and change URL.
Choose second option and type “mail” (i.e. http://mail.yourdomain.com)
Hit Save Changes and you are all done.
That’s all for this tutorial. Hope you have not faced any problems. If there are any problems in setup, let me know to serve you. Have a good day and happy blogging.
Post a Comment
Please DON'T spam here. Spam comments will be deleted just after our review.