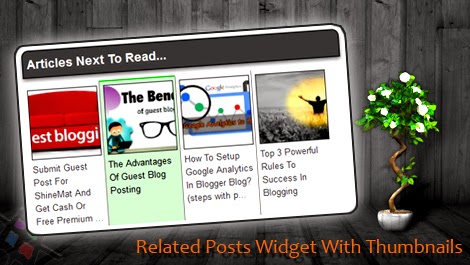
Few days ago we have shared how to install text version related post widget in blogger blog. Today we have come with a new thumbnails version related post widget. We know that showing associated posts from same labels just at bottom of each post will definitely increases the pageviews.
I have customized the CSS codes as just I like. You can also customize this related post widget as your blog’s theme color to see friendly.
Important Note: To make this blogger widget properly worked, make sure you have add labels to your every blog post. Otherwise it won't work.
Okay! Now let’s setup the related post widget with thumbnails in blogger blog.
ALSO READ: How To Install Google Analytics In Blogger Blog?

1. Sign into your blogger account
2. Click on your blog title.
3. Click Template from left side menu.
4. Backup your template before editing.
5. Click Edit HTML, Click Proceed.
6. Click on the code box and press Ctrl+F.
7. Search for </head>
8. Now paste the following CSS code just above/ before </head> tag.
9. Now search again for <data:post.body/>
10. Paste the following script after/ below of <data:post.body/>
11. Finally click Save Template button to complete.
SEE ALSO: How To Change Newer, Older And Home Link With Image Buttons?
Customization Area:
1. Change the var maxresults=4; number with your own number of posts that you want to display.
2. To adjust the widget headline's width just change 450px with your desired width value.
3. To change the headline title simply change the text "Articles Next To Read..."
4. To change headline's background color, change the 4D4B4B
5. To change headline's border color change 2F2F2F
6. To change mouse hover color, change D1FAD0
I have customized the CSS codes as just I like. You can also customize this related post widget as your blog’s theme color to see friendly.
Important Note: To make this blogger widget properly worked, make sure you have add labels to your every blog post. Otherwise it won't work.
Okay! Now let’s setup the related post widget with thumbnails in blogger blog.
ALSO READ: How To Install Google Analytics In Blogger Blog?

1. Sign into your blogger account
2. Click on your blog title.
3. Click Template from left side menu.
4. Backup your template before editing.
5. Click Edit HTML, Click Proceed.
6. Click on the code box and press Ctrl+F.
7. Search for </head>
8. Now paste the following CSS code just above/ before </head> tag.
<!--Related Post Widget ShineMat.com Starts-->
<b:if cond='data:blog.pageType == "item"'>
<style type='text/css'>
#sm-thumb-related-posts {
float: center;
text-transform: none;
height: 100%;
min-height: 100%;
padding-top:5px;
padding-left: 5px;
}
#sm-thumb-related-posts h2{
background: #4D4B4B;
float: left;
width: 450px;
padding: 5px;
font-family: Helvetica,Arial,sans-serif;
<!--shinemat.com-->
font-size: 18px;
font-weight: bold;
color: #FBFBF8;
border: 2px solid #2F2F2F;
box-shadow: 0px 3px 5px #767373;
border-top-left-radius: 10px;
border-top-right-radius: 10px;
}
#sm-thumb-related-posts a{
color: #3F3E3E;
width: 100px;
height: 200px;
border-top: 2px solid #ffffff;
}
#sm-thumb-related-posts a:hover{
color: black;
background-color: #D1FAD0;
width: 100px;
height: 200px;
border-top: 2px solid #0CD407;
transition: all 0.3s ease-in-out 0s;
}
#sm-thumb-related-posts img{
border: 1px solid #212020;
}
</style>
<script type='text/javascript'>
var defaultnoimage="https://blogger.googleusercontent.com/img/b/R29vZ2xl/AVvXsEgig5zf0yWYfpamH-Trlm94PM97Ae-zCORHAyPqybt2WytvsvRHfXu_1rqfPwFu6IvbMJtGrul2c7ssnW8JqJvUHl_F0hMsYHY1PWWmJYE09Tei8KRt0mbiQ5HxjRWkjIdT8RU5HWHBSTo/s1600/related-post-default-no-image-shinemat.jpg";
var maxresults=4;
var splittercolor="#857D7D";
var relatedpoststitle="Articles Next To Read...";
</script>
<script src='https://googledrive.com/host/0B2c_2BWPUGv7YS13RFo3Zzl4Sjg/blogger-related_post_with_thumbnails-shinemat.js' type='text/javascript'/>
</b:if>
<!--Related Post Widget ShineMat.com Ends-->
9. Now search again for <data:post.body/>
10. Paste the following script after/ below of <data:post.body/>
<!--Related Post Widget ShineMat.com Starts--> <b:if cond='data:blog.pageType == "item"'> <div id='sm-thumb-related-posts'> <b:loop values='data:post.labels' var='label'> <b:if cond='data:label.isLast != "true"'> </b:if> <script expr:src='"/feeds/posts/default/-/" + data:label.name + "?alt=json-in-script&callback=related_results_labels_thumbs&max-results=5"' type='text/javascript'/></b:loop> <script type='text/javascript'> removeRelatedDuplicates_thumbs(); printRelatedLabels_thumbs("<data:post.url/>"); </script> </div><div style='clear:both'/> </b:if> <b:if cond='data:blog.url == data:blog.homepageUrl'><b:if cond='data:post.isFirstPost'> </b:if></b:if> <!--Related Post Widget ShineMat.com Ends-->
11. Finally click Save Template button to complete.
SEE ALSO: How To Change Newer, Older And Home Link With Image Buttons?
Customization Area:
1. Change the var maxresults=4; number with your own number of posts that you want to display.
2. To adjust the widget headline's width just change 450px with your desired width value.
3. To change the headline title simply change the text "Articles Next To Read..."
4. To change headline's background color, change the 4D4B4B
5. To change headline's border color change 2F2F2F
6. To change mouse hover color, change D1FAD0
7. To change mouse hover top border color, change 0CD407
That's all friends. I have tried to explain everything as easy as I can. If you have any question about this please feel free to ask me. I am here to help you.
Happy blogging pals. Remember me in your prayers. Allah Hafez.

I love it, please admin I'm unable to find
ReplyDeletePost a Comment
Please DON'T spam here. Spam comments will be deleted just after our review.